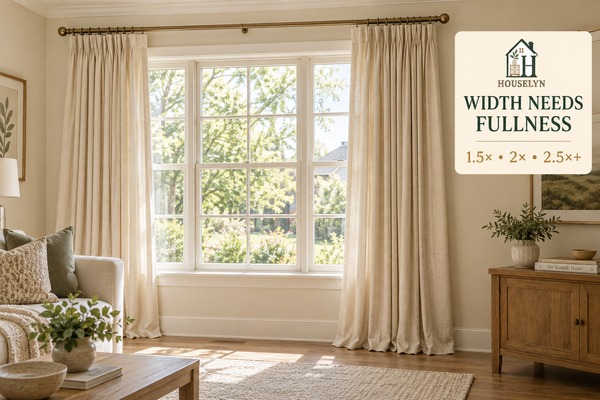
Curtain Height and Width Rules: How High, Wide & Full Curtains Should Be
Curtain proportions work best when rod height, rod width, fabric fullness and
finished length are planned as one system.
Accurate curtain measurements are what separate curtains that
merely cover a window from curtains that make the window, wall and room feel
properly proportioned.
The most useful curtain measurements begin with more than the
glass or window frame. The distance to the ceiling, available wall space on each
side, finished floor level, radiators, nearby furniture and curtain heading all
affect where the rod and fabric should actually sit.
That is why curtain height and width rules should be treated as
a connected measurement system rather than four separate decisions. Raising the
rod changes the required curtain length. Extending the rod changes the width of
fabric needed. Increasing fullness changes how much material must stack beside
the window.
Good curtain measurements also need to account for the way the
window is used. Curtains should not prevent a window from opening, sit unnecessarily
against a radiator, interfere with patio doors or become trapped behind furniture.
Why Curtain Measurements Need to Be Planned as One System
A common mistake is choosing curtain length first and then trying to make the rod
position fit that purchase. A more reliable approach is to decide the intended
rod height, rod extension and finished curtain position before selecting the final
panel dimensions.
The same applies to width. A curtain panel that technically covers half the
window may still look under-scaled once it is drawn closed because the fabric
lacks enough fullness.
This guide uses practical ranges and formulas rather than pretending that one
number works for every home. Curtain heading, fabric weight, wall construction,
ceiling height and hardware design can all change the final installation.
Where manufacturer guidance applies—especially for rod spans, brackets, wall
anchors and heavier curtains—it should take priority over a generic decorating rule.
The purpose of these curtain measurements is not to create a
rigid formula that ignores the room. It is to give each decision a clear order so
the rod, panels and surrounding architecture work together.
The page also stays deliberately focused. General living room styling belongs in
Living Room Decor, whole-room proportion belongs in
Living Room Design Ideas, and furniture circulation belongs in
Living Room Layout Basics. Here, the job is precise curtain measurement,
placement and clearance.
Framework Stage 1 — Measure
Chapter 1: Curtain Height and Width Rules Start With Accurate Window Measurements
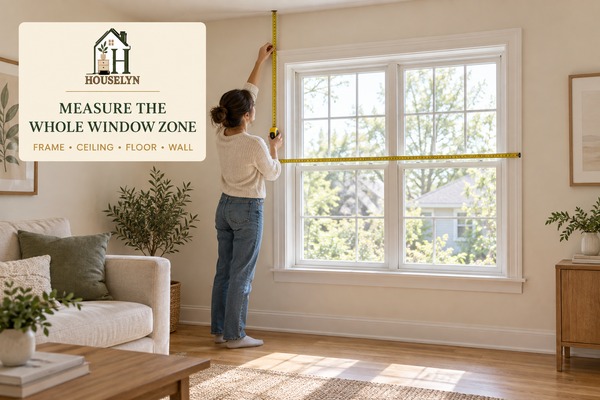
Measure the architecture around the opening before deciding where the curtain
rod or finished fabric should sit.
Accurate curtain measurements start with the architecture, not
the curtain package. Before choosing a rod, panel width or finished length,
record the dimensions of the window and the usable wall around it.
This is the foundation of reliable curtain height and width rules.
A window that appears standard can behave very differently when the ceiling is
unusually low, one side wall is narrow or a radiator projects beneath the sill.
Measure the Window Frame Width First
Measure the outside width of the window frame rather than only the glass. The
frame provides a more useful architectural reference for deciding how far the
rod should extend on each side.
Record the measurement clearly and do not yet add the rod extension. That extra
width is a separate decision that will be made after the surrounding wall space
has been assessed.
Measure the Window Frame Height
Measure from the top outside edge of the frame to the bottom edge or sill,
depending on the construction of the window.
This dimension helps establish the scale of the opening, but it does not by itself
determine curtain length because most floor-length installations extend well
beyond the window frame.
Measure From the Top of the Window to the Ceiling
This gap is essential for setting rod height. Record the distance from the top
of the frame to the ceiling or to any substantial ceiling moulding that limits
the usable mounting area.
Good curtain measurements separate the available mounting space
from the final rod position. Later, the rod can be raised within that space based
on the room proportions, curtain heading and hardware.
Measure From the Floor to the Top of the Window
This gives you another important vertical reference and helps reveal whether the
floor is level across the width of the window.
Measure near both sides where practical. Even small differences can matter when
the intended curtain finish is close to the floor.
Measure the Available Wall on Both Sides
Record the distance from each outside edge of the window frame to the nearest wall,
built-in cabinet, doorway or other fixed obstruction.
These dimensions affect how far the rod can extend and how much room is available
for the curtains to stack when open. Strong curtain measurements
do not assume both sides of the window have equal space.
Record the Sill Depth
Window sills can project into the room enough to affect shorter curtains or other
window treatments. Measure the projection from the wall if the sill is substantial.
For floor-length curtains, sill depth may matter less visually, but it can still
influence how fabric hangs close to the window.
Measure Any Radiator or Heating Projection
If a radiator or heater sits beneath the window, record its height, depth and
relationship to the sill before choosing the finished curtain length.
Curtains should not be planned in a way that unnecessarily traps heat or conflicts
with the relevant heater manufacturer's guidance. The clearance decision belongs
later in the framework, but the measurement belongs here.
Check Nearby Furniture Before You Finalise the Width
Sofas, bookcases, sideboards and tall lamps positioned beside the window can reduce
the space available for fabric to stack naturally.
Include these restrictions in your curtain measurements before
deciding the rod extension. Otherwise, a technically correct rod width may leave
the curtains compressed behind furniture.
Measure More Than Once
Recheck the important dimensions before buying or drilling. Where floors or
ceilings are slightly uneven, compare more than one point rather than relying
on a single measurement.
This makes later curtain measurements more dependable because
the rod and finished panels can be planned around the real room rather than an
assumed perfect rectangle.
Do Not Choose the Curtain Length Yet
At this stage, gather dimensions only. The final curtain length depends on where
the rod will actually sit, what heading is used and whether the intended finish
is above the floor, touching it, breaking or puddling.
Keeping those decisions separate prevents one of the most common mistakes in
curtain measurements: buying a standard panel length first and
then lowering the rod simply to make that panel reach the floor.
With the complete measurement map in place, the next stage is
Raise: deciding how high the curtain rod should sit above the
window without crowding the ceiling, moulding or chosen curtain heading.
Framework Stage 2 — Raise
Chapter 2: How High Should You Hang Curtain Rods?
Rod height should relate to the top of the window, the ceiling above and the
finished curtain length below.
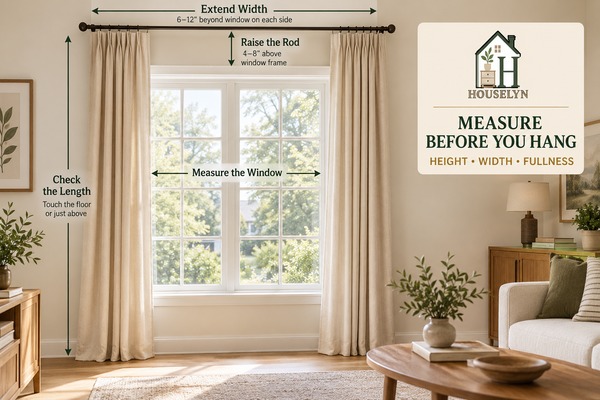
Rod height is one of the most influential curtain measurements
because it changes how tall the window appears and determines the finished length
the curtain panels will need.
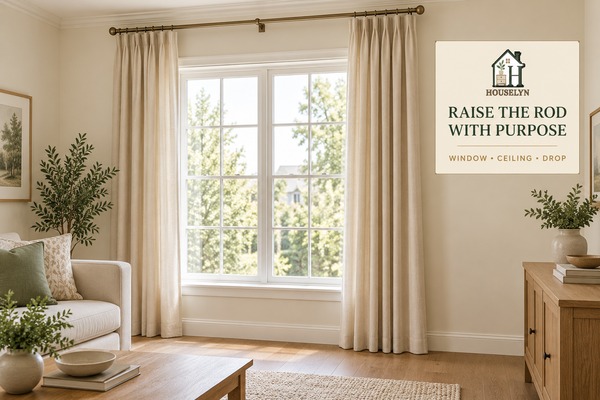
Practical curtain height and width rules usually favour mounting
the rod above the window frame rather than directly on its top edge, provided
there is enough clear wall and the chosen hardware can be installed securely.
Start With the Space Above the Window
Use the measurement taken from the top of the frame to the ceiling as your working
zone. In many standard rooms, placing the rod several inches above the frame can
visually lengthen the window without making the hardware feel detached from it.
Where there is generous wall space above the window, a higher rod often produces
a cleaner vertical line. Where the ceiling is low or substantial moulding occupies
the space, the available position may be more constrained.
Do Not Treat One Height as Universal
A commonly used decorating approach is to mount the rod roughly 10–20 cm
(about 4–8 inches) above the top of the window frame when the architecture allows.
This is a practical starting range rather than a compulsory rule.
The correct curtain measurements still depend on the ceiling gap,
heading style, rod diameter, rings or gliders, curtain length and any moulding
above the window.
When Should the Rod Go Closer to the Ceiling?
Where the gap above the window is large, placing the rod closer to the ceiling
can make the window treatment feel taller and more integrated with the wall.
Leave enough breathing room for the finials, brackets, rings and curtain heading.
Do not crowd the rod into ceiling cornices or decorative mouldings simply to make
it as high as possible.
Low Ceilings Need Careful Proportion
In a lower-ceiling room, raising the rod can still help create a taller visual line,
but there may be little space between the frame and ceiling.
If the rod is placed too tightly against the ceiling, installation can look
cramped and curtain rings or heading details may not operate comfortably.
Strong curtain measurements leave enough functional clearance
for the actual hardware being used.
Tall Ceilings Do Not Always Mean Ceiling-Height Curtains
Very tall rooms require proportion rather than automatic maximum height. Mounting
a rod dramatically above a modest window can visually disconnect the curtains
from the opening if the wall between them feels excessive.
Use the overall wall composition, window height and intended curtain length to
decide whether a ceiling-adjacent installation or a more moderate raised position
feels balanced.
Account for the Curtain Heading
Eyelet, pencil-pleat, pinch-pleat and wave curtains interact with rods or tracks
differently. The visible top of the fabric does not always begin at the same point
as the top of the rod.
Include that difference in your curtain measurements before
ordering the final length. Manufacturer measuring guidance for the specific
heading should take priority where it specifies a particular reference point.
Check Rings, Hooks and Gliders
When curtains hang from rings or hooks, the fabric may begin below the rod.
Tracks can create a different finished drop again.
Measure from the point where the curtain will actually hang, not automatically
from the top of the hardware.
Respect Crown Moulding and Architectural Trim
Ceiling mouldings, picture rails and substantial window trim can limit the clean
mounting area. Avoid drilling into decorative features unless the installation
is specifically designed for them.
The strongest curtain height and width rules adapt to the
architecture rather than forcing a fashionable mounting height into every room.
Mark the Proposed Height Before Drilling
Use low-tack tape or light pencil marks to test the proposed rod position across
the wall. Step back and check how the height relates to the window, ceiling and
other horizontal lines in the room.
Recheck the vertical curtain measurements from the intended
hanging point to the final curtain endpoint before making the installation permanent.
Check the Wall Before Fixing Brackets
Curtain rods carrying wide or heavy panels can place meaningful load on their
brackets. The correct fixing method depends on the wall construction, bracket
design, rod span and curtain weight.
Use fixings suitable for the wall type and follow the hardware manufacturer's
load and installation instructions. Where drilling could encounter hidden
electrical cables, pipes or uncertain wall structure, use an appropriate detector
or seek qualified installation help rather than guessing.
Once the rod height is established, the next stage is Extend:
deciding how far the rod should project beyond the window frame so open curtains
can stack naturally without unnecessarily covering the glass.
Framework Stage 3 — Extend
Chapter 3: How Wide Should a Curtain Rod Extend Past the Window?
Extra rod width gives curtain panels somewhere to stack and can keep more of
the window glass visible when the curtains are open.
Horizontal curtain measurements matter because the curtain rod
needs to support both the window opening and the fabric that sits beside it when
the curtains are drawn open.
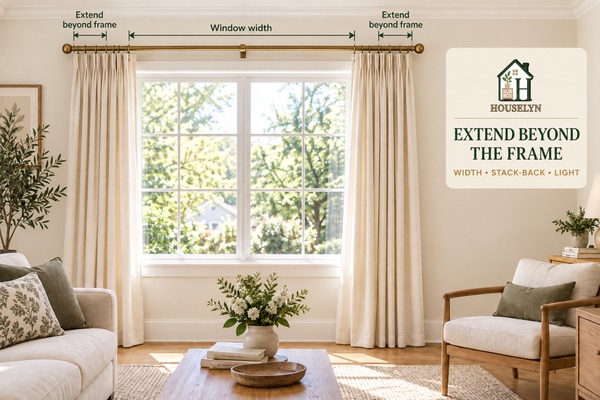
In practical curtain height and width rules, the rod is usually
wider than the window frame rather than ending directly at its outside edges.
That additional width gives the panels room to stack and can expose more glass.
Start With the Outside Width of the Window Frame
Use the frame width recorded in Chapter 1 as your architectural starting point.
Do not calculate from the glass alone, because the frame itself occupies part of
the visual opening.
Add the intended extension on the left and right only after checking the usable
wall space on both sides.
How Far Should the Rod Extend?
A practical starting range in many rooms is roughly 15–30 cm (about 6–12 inches)
beyond the window frame on each side where wall space allows. The exact extension
should respond to curtain bulk, window width and surrounding architecture rather
than being treated as a fixed rule.
Wider or fuller curtains may require more stack-back space, while a narrow wall
beside the window may require less. The purpose of the extra width is functional:
it gives the fabric somewhere to go.
Think About Stack-Back Before Choosing Rod Width
Stack-back is the width occupied by the gathered curtain when it is open. Thick
lined or blackout curtains usually create a larger stack than light unlined fabric.
Good curtain measurements therefore consider both the window and
the volume of fabric. The more material you use, the more side space may be needed.
Keep the Glass as Clear as the Room Allows
When there is generous wall space, allowing open panels to sit mostly beyond the
frame can increase the amount of visible glass and daylight.
This does not mean the curtains must disappear completely from the opening. A
small overlap can still look balanced, especially with heavier fabrics or narrower walls.
Narrow Windows Can Often Take More Extension
Extending the rod beyond a narrow window can visually broaden the overall
treatment and provide space for the panels to sit beside the glass.
The important point is to keep the extension proportional to the surrounding wall
rather than creating a rod that looks disproportionately long.
Wide Windows Need Hardware Support as Well as Width
A wider window may require a longer rod, but increasing rod span also increases
the importance of suitable brackets and centre support.
Check the manufacturer's recommended span, bracket spacing and weight capacity
before relying on decorative curtain measurements alone.
Heavy curtains can create significantly more load than light sheers.
Measure the Left and Right Side Separately
Many windows are not centred perfectly on their wall. One side may have generous
clearance while the other sits close to a corner, door frame, shelving unit or cabinet.
Strong curtain measurements account for these differences rather
than automatically adding the same extension to both sides.
Furniture Can Limit the Useful Extension
A bookcase, floor lamp, tall plant or cabinet positioned beside the window may
occupy the wall space needed for curtain stack-back.
Repositioning movable furniture may produce a better curtain installation than
permanently shortening the rod. Fixed furniture, however, needs to be treated as
a real boundary.
Corner Windows Need a Different Approach
Where a window sits close to a perpendicular wall, there may be little room to
extend the rod on that side.
In that situation, the available side wall—not a generic rule—sets the practical
limit. The opposite side may be able to carry more of the visual extension.
Do Not Make the Rod Wider Than the Fabric Can Support
The rod can extend beautifully beyond the frame, but the curtain panels still
need enough total fabric width to close across that larger span with the intended fullness.
This is why rod width and panel width should not be chosen independently. Once the
final rod width is known, it becomes the basis for the fullness calculation in the
next chapter.
Mark Both Ends Before Installation
Use the rod height established in Chapter 2 and mark the proposed left and right
bracket positions before drilling.
Step back and check whether the extended rod visually centres the treatment around
the window. Recheck the horizontal curtain measurements before
fixing the brackets permanently.
Once the finished rod width is known, the next stage is Full:
calculating how much total curtain fabric is needed so closed panels look gathered
and intentional rather than flat or under-sized.
Framework Stage 4 — Full
Chapter 4: Curtain Width Rules Depend on Fullness, Not Just Window Width
The finished rod span determines how much width must be covered; the fullness
multiplier determines how much fabric is needed to cover it attractively.
Once the rod span is established, the next curtain measurements
should calculate how much total fabric width is needed across that span.
This is one of the most important curtain height and width rules
because curtains that are technically wide enough to close can still look
undersized when they lack sufficient gathering.
Calculate Width From the Rod, Not Only the Window
The rod width established in Chapter 3 is the more useful basis for panel
calculations because that is the actual horizontal distance the curtains need to cover.
If the rod extends beyond the window frame, buying panels based only on the original
window width can leave too little fabric to achieve the intended fullness.
What Does Curtain Fullness Mean?
Fullness describes the relationship between the width of the curtain fabric and
the width it needs to cover when hung.
For example, curtains with twice the width of the rod are described as having
approximately 2× fullness before allowances for the specific heading, overlap,
returns or manufacturer instructions.
Use a Fullness Multiplier as a Planning Tool
A useful general starting point is around 1.5× for a relatively light or restrained
treatment, around 2× for a fuller standard look, and around 2.5× or more where the
fabric and heading are designed for a richer effect.
These are planning ranges rather than universal specifications. Heading systems,
ready-made curtain instructions and track manufacturers may require a different
amount of fabric.
A Simple Fullness Example
If the finished curtain rod is 200 cm wide and the intended fullness is 2×,
the starting calculation is 400 cm of total finished curtain width.
For a pair of curtains, that would suggest roughly 200 cm of finished width per
panel before checking the heading system, manufacturer guidance, overlap and
any required returns.
Panel Width Is Not Always Fabric Width
Ready-made curtain packaging may state the width of each flat panel, while
custom curtains may be specified by finished width or track coverage.
Read the product description carefully before applying your
curtain measurements. Two products labelled with similar
dimensions can behave differently once pleated or gathered.
Eyelet Curtains Need Enough Width to Form Waves
Eyelet curtains form alternating folds around the rod. If the total curtain width
is too close to the rod width, those waves flatten when the curtains are closed.
Use the manufacturer's recommended fullness where provided, especially because
eyelet spacing and fabric stiffness affect the finished appearance.
Pencil Pleat Curtains Are Adjustable, But Not Unlimited
Pencil-pleat headings can often be gathered to suit a range of widths, but the
starting curtain width still needs enough fabric to create an attractive gathered
heading.
Do not pull a very wide curtain down to an excessively narrow heading or stretch
a narrow curtain almost flat simply because the heading tape allows some adjustment.
Pinch Pleats and Other Structured Headings Need Specific Planning
Pinch pleats and similar tailored headings create fixed or semi-fixed folds.
Their finished width may be determined during manufacture rather than adjusted
freely at installation.
For these treatments, supplier specifications should guide the final
curtain measurements rather than applying a generic fullness
multiplier without adjustment.
Wave Curtains Work as a System
Wave or ripple-style curtains rely on compatible track components and controlled
spacing to create consistent folds.
Because the heading, gliders and track work together, follow the relevant system's
measuring instructions rather than converting it casually from another curtain style.
Heavy Fabrics Can Look Fuller With Less Visual Volume
Thick velvet, lined blackout curtains and dense woven fabrics occupy more physical
space when stacked than lightweight linen-look fabrics or sheers.
This means curtain measurements need to balance the desired
closed fullness against the amount of side-wall space available when the panels
are open.
Sheer Curtains Often Benefit From More Fullness
Lightweight sheer fabrics can become visually flat when stretched too widely.
Additional fullness can create more depth while still allowing filtered light.
Again, fabric behaviour matters. Very crisp, textured or patterned sheers may
respond differently from soft voile.
One Panel or Two Panels?
A pair of curtains is common because it creates balanced stack-back on both sides
and allows the treatment to open from the centre.
A single panel may suit patio doors, asymmetrical windows or installations that
need to stack in one direction. The total width requirement does not disappear;
it is simply carried by one panel instead of two.
Do Not Forget Overlap and Returns
Some tracks and curtain systems include centre overlap or fabric returns at the
outside edges to reduce light gaps and create a cleaner side profile.
If the system specifies these allowances, add them to the
curtain measurements rather than assuming the simple rod-width
calculation covers every detail.
Once the total width is established, the next stage is
Lengthen: deciding where the curtain should finish at the floor,
sill or below the sill so the vertical proportion looks equally intentional.
Framework Stage 5 — Lengthen
Chapter 5: Curtain Length Rules — Where Should Curtains Finish?
The best finished length depends on the hanging point, floor level, window type
and whether the room needs floor-length, sill-length or below-sill curtains.
Vertical curtain measurements should be taken from the actual
hanging point of the curtain to the intended finished position, not simply from
the top of the window frame.
Within practical curtain height and width rules, floor-length
curtains often create the strongest vertical line, but they are not automatically
the right choice for every window, radiator or household.
Measure From the Actual Hanging Point
The rod, rings, hooks or track determine where the curtain fabric really begins.
Eyelets, pleats and gliders can all shift that starting point.
Follow the curtain or heading manufacturer's measuring instructions when provided,
then measure down to the intended endpoint.
Floor-Length Curtains Usually Need a Deliberate Finish
Curtains that finish close to the floor can create a clean uninterrupted vertical
line and often suit living rooms where there is no heating or furniture conflict
beneath the window.
The key is consistency. Panels that stop noticeably short of the intended floor
line can look accidental even when the rod height and width are well planned.
Option 1: Hover Slightly Above the Floor
A small clearance above the floor can make curtains easier to open, reduce fabric
dragging and simplify cleaning.
This approach can work well in busy living rooms, homes with pets or situations
where the floor is not perfectly level.
Option 2: Let the Curtain Just Meet the Floor
A curtain that lightly meets the floor can create a crisp, tailored appearance
without a visible gap.
This finish demands accurate curtain measurements because even
small changes in rod height, heading position or floor level can affect the result.
Option 3: Use a Soft Break
A soft break adds a small amount of extra length so the fabric bends gently where
it reaches the floor.
This can create a slightly more relaxed look, but the additional fabric should
remain controlled rather than gathering into a large untidy pile.
Option 4: Puddle the Curtains
Puddling uses deliberate excess fabric on the floor and creates a more formal or
romantic appearance.
It also increases maintenance because fabric collects dust more easily and can be
less practical around children, pets, frequently used doors or busy circulation routes.
Sill-Length Curtains Need a Clear Reason
Shorter curtains may be more practical where a radiator, deep sill, built-in
furniture or another fixed feature makes full-length fabric unsuitable.
A sill-length treatment should finish cleanly in relation to the sill rather than
stopping at an arbitrary point nearby.
Below-Sill Curtains Offer Another Practical Option
Curtains that extend below the sill but stop above a radiator or other obstruction
can provide more visual length than a sill finish without reaching the floor.
Keep the endpoint visually separate from the obstruction rather than allowing the
hem to brush unpredictably against it.
Uneven Floors Need More Than One Measurement
Measure from the proposed hanging point to the floor near both sides of the
window, and consider checking the centre on wider installations.
These curtain measurements can reveal small floor differences
that might otherwise make one panel appear longer after installation.
Check the Finished Length After the Heading Is Set
Adjustable hooks and pleated headings can slightly alter where the curtain sits
vertically. Make final adjustments only after the heading has been arranged as
intended.
Avoid using the heading to compensate for a major measuring error because this
can distort the top of the curtain.
Heavy Curtains Can Settle After Hanging
Some fabrics relax under their own weight after installation, particularly where
curtains are long, lined or made from heavier materials.
Where precise hemming is required, allow the fabric to hang according to the
maker's or workroom's guidance before making irreversible alterations.
Children and Pets May Change the Best Finish
Floor-puddling curtains can be attractive but may be less suitable where young
children or pets regularly pull, lie on or move through the fabric.
A slightly cleaner floor clearance may provide a better balance between appearance
and daily practicality.
Doorways Need Enough Curtain Clearance
Curtains beside French doors, patio doors or frequently opened glazed doors should
not bunch where people step or become trapped in the closing mechanism.
The correct curtain measurements must therefore account for how
the opening is actually used, not just how it looks when the doors are closed.
Radiators Can Override a Floor-Length Preference
Where a radiator or other heater sits directly beneath the window, full-length
curtains may restrict heat movement or conflict with the heater manufacturer's guidance.
Measure the heating zone before committing to the finished length. The next chapter
covers these clearance decisions in more detail.
Do Not Lower the Rod Just to Fit Ready-Made Curtains
If standard curtain lengths do not match the rod height that best suits the room,
lowering the rod can undo the visual proportion established earlier.
Consider an appropriate longer size or a properly altered hem instead. Good
curtain measurements should drive the purchase rather than forcing
the installation to accommodate the wrong panel length.
With the rod height, width, fullness and finished length established, the next
stage is Clear: checking whether radiators, furniture, doors
and unusual window shapes require the standard curtain plan to change.
Framework Stage 6 — Clear
Chapter 6: Curtain Height and Width Rules Change Around Radiators, Furniture & Doors
Curtain measurements should change when fixed features affect how the fabric
can hang, stack or move safely.
The best curtain measurements are not always the ones that produce
the tallest or widest possible treatment. They are the ones that still allow the
room, window and heating to work properly.
That is why practical curtain height and width rules need exceptions.
A radiator below the window, a sofa pressed too close to the wall or a frequently
used patio door can change the most sensible length, width or stacking direction.
Radiators Beneath Windows Need Priority
A radiator directly below the window can conflict with full-length curtains,
particularly when the panels are closed across the heat source.
Check the radiator manufacturer's guidance and the room's heating requirements
before choosing curtain length. In some spaces, sill-length or below-sill curtains
may be more practical than fabric that reaches the floor.
Do Not Trap Full-Length Curtains Against a Radiator
Where full-length curtains are used near heating, the fabric should not be planned
in a way that unnecessarily traps warm air or rests against surfaces that the
manufacturer says must remain clear.
These clearance decisions should be included in the final
curtain measurements before panels are ordered or altered.
A Sofa Under the Window Can Restrict Curtain Movement
Sofas are often positioned below or beside windows, but upholstery pressed directly
against curtain fabric can stop panels moving freely and crush the folds.
If the sofa cannot move forward, reconsider the curtain type, stack-back or length
rather than allowing the fabric to become permanently trapped.
Side Furniture Can Reduce Stack-Back Space
Tall cabinets, bookcases and floor lamps beside a window may occupy the wall area
that was intended for open curtains.
Strong curtain measurements use the available wall width after
fixed obstructions are accounted for, not the theoretical width of an empty wall.
Patio Doors Need to Open Without Fighting the Curtains
Curtains beside patio or French doors should be able to stack clear of handles,
hinges and the main walking path.
A one-way draw may be more practical where most of the free wall sits on one side.
In other rooms, a pair of panels can work well if both sides provide adequate stack-back.
Door Handles Need Clearance Too
Check whether the curtain or tieback can catch on handles when the door opens.
This is especially important where the curtain hangs close to the glazing rather
than projecting well into the room.
Include the full swing of the door in your curtain measurements
instead of measuring only the closed opening.
Bay Windows Need a Different Hardware Strategy
Bay windows introduce multiple angles, short wall sections and corners that can
make a straight rod impractical.
Flexible tracks, bay-window poles or purpose-made systems can follow the shape
more effectively, but measurements should be taken for each section rather than
reducing the bay to one overall width.
Corner Windows Need Shared Clearance
Two windows meeting near a corner can compete for the same curtain stack-back area.
One treatment may need to stack away from the corner, or both may require reduced
side extension.
These are cases where standard symmetrical curtain height and width rules
should yield to the actual architecture.
Built-In Shelving Can Set the Practical Rod Limit
Shelving, cabinets and fitted media units beside a window act as permanent boundaries.
Do not plan a rod extension that leaves the curtain trapped between the window and built-in.
Instead, calculate the useful stack-back area between the frame and the fixed unit.
Deep Window Sills Can Affect Shorter Curtains
Sill-length or below-sill curtains need enough projection from the wall to hang
cleanly past deep window boards.
If the sill projects substantially, check the bracket or track projection as part
of the curtain measurements.
Flexible Tracks Can Solve Awkward Geometry
Where walls curve, bays change direction or doors need fabric to move around an
angle, a suitable flexible track may provide more freedom than a conventional straight rod.
The track still needs secure fixing, adequate weight capacity and enough bend radius
for the chosen system. Follow the manufacturer's installation limits.
Tiebacks Can Improve Daytime Clearance
Tiebacks or holdbacks can help keep curtain fabric away from glazing, handles or
adjacent furniture when the curtains are open.
Position them where they gather the fabric naturally without pulling the curtain
into an exaggerated diagonal or damaging the wall finish.
Asymmetrical Rooms Can Use Asymmetrical Solutions
If one side of a window has significantly more wall space than the other, the most
practical solution may not look perfectly symmetrical.
A single panel, unequal stack-back or one-direction opening can sometimes work
better than forcing both sides to behave identically.
Recheck the Entire Installation After Adding Clearance
Once radiators, furniture, doors and architectural obstacles have been considered,
recheck the final curtain measurements.
A clearance adjustment may change rod width, curtain length, panel direction or
even the hardware type. Treat those changes as part of the design rather than
last-minute compromises.
With the curtain dimensions adapted to the room, the next stage is
Check: verifying rod position, fullness, finished length,
clearance and bracket support one final time before drilling or ordering.
Framework Stage 7 — Check
Chapter 7: Check Every Curtain Measurement Before You Drill
A final check before drilling can catch height, width and clearance problems
while they are still easy to correct.
The final curtain measurements should be checked as one connected
installation rather than as separate numbers collected across several stages.
This is where the full curtain height and width rules come together:
the rod must sit at the intended height, extend to the planned width, support the
correct amount of fabric and allow the finished panels to hang without obstruction.
Mock Up the Rod Position First
Use low-tack tape or removable marks to indicate the proposed bracket positions.
This allows you to see the full rod width and height before the wall is drilled.
Stand back from the window and check whether the line feels balanced with the
ceiling, frame and surrounding wall.
Recheck Rod Height
Measure the proposed height again from the top of the window and from the finished
floor where appropriate.
Confirm that rings, eyelets, hooks or track gliders have enough clearance and that
the final curtain length still works from the actual hanging point.
Recheck Rod Width
Measure from the proposed left bracket position to the proposed right position.
Compare that span with the rod or track you plan to use.
These curtain measurements should also leave enough wall space
for the panels to stack without colliding with furniture, shelving or nearby walls.
Confirm the Left and Right Extension
Do not assume the window is perfectly centred or the wall clearances match.
Measure each side independently.
Where the extensions differ because of the room architecture, step back and decide
whether the final treatment still looks visually balanced.
Confirm the Curtain Width and Fullness
Use the final rod or track width—not an earlier window-only measurement—to calculate
how much total panel width is required.
Recheck the intended fullness multiplier against the curtain heading or manufacturer's
guidance before placing an order.
Confirm Panel Count
Decide whether the treatment uses a pair of panels, a single panel or a specialist
multi-part system.
Make sure the combined panel width provides the total coverage and fullness needed.
Two panels should not each be treated as though they individually need the entire total width.
Confirm the Finished Length
Measure from the real curtain hanging point to the intended finish at the floor,
sill or below the sill.
Check more than one point where floors may be uneven. Accurate vertical
curtain measurements are particularly important for a floor-kiss
or very small hover where minor differences remain visible.
Check Radiator and Heater Clearance
If the window has a radiator or heater beneath it, confirm that the curtain plan
complies with the relevant manufacturer's clearance guidance and does not
unnecessarily obstruct heat movement.
If it does, revise the curtain length or treatment before ordering.
Check Window and Door Operation
Open the window fully. Operate the handles. Open nearby patio or French doors.
Check whether the proposed curtain and tieback positions interfere.
These practical checks should happen before drilling because curtain hardware
can occupy space that looked empty when everything was closed.
Check Curtain Stack-Back
Estimate where the open panels will sit. Heavier curtains and fuller treatments
need more wall area than light, minimally gathered fabric.
If the stack would block too much glass, revisit the rod extension or curtain
fullness rather than accepting the problem after installation.
Check Bracket Support and Wall Type
Confirm that the fixing method is appropriate for the wall construction, curtain
weight and span of the rod or track.
Plasterboard, masonry and other wall types can require different fixings. Follow
the curtain-hardware manufacturer's instructions and use suitable wall anchors
rather than relying on one generic fixing method.
Check for Hidden Services Before Drilling
Wall areas around windows can contain electrical cables, pipes or structural
elements that are not visible from the room.
Use an appropriate detector where needed, follow safe drilling practices and seek
qualified help if the wall construction or service location is uncertain.
Check the Curtain Heading One Last Time
The heading determines how the panel connects to the rod or track and can change
both the visible top position and finished width.
Match your final curtain measurements to the exact product or
curtain style being installed rather than relying on dimensions from a different
heading type.
Keep the Final Measurements in One Place
Before ordering, write down the final rod height, final rod width, panel count,
total required width, heading type and finished curtain drop.
Keeping one final specification reduces the risk of accidentally buying from an
earlier draft measurement.
Do Not Ignore a Failed Check
If the curtain blocks a door, sits against heating, lacks adequate stack-back or
cannot achieve the planned length, return to the relevant stage of the framework.
Strong curtain height and width rules are useful because they
expose these conflicts before installation. They should not be used to justify a
measurement that the room has already shown will not work.
With every dimension verified, the framework itself is complete. The final
chapter turns those rules into a diagnostic check by showing the curtain
measurement mistakes that most often make windows look smaller, shorter or less
polished than intended.
Final Diagnostic — Common Mistakes
Chapter 8: Curtain Measurement Mistakes That Make Windows Look Smaller
Rod placement, fabric width and finished length can either support the window's
proportions or make the whole treatment appear smaller.
Poor curtain measurements do more than create an awkward hem or
narrow rod. They can change the apparent proportions of the entire window.
The most common failures usually come from breaking one of the connected
curtain height and width rules: height, extension, fullness,
length and clearance are planned separately instead of as one installation.
Mistake 1: Mounting the Rod Too Low
A rod fixed immediately above the window frame can visually compress the vertical
area when there is generous unused wall above it.
Where the architecture allows, raising the rod can create a stronger vertical line.
The final position still needs to respect ceiling moulding, heading style, hardware
clearance and the available curtain length.
Mistake 2: Making the Rod Too Narrow
Rods that stop close to the outside edges of the frame leave very little wall space
for the curtain panels to occupy when open.
The result is often a window with significant glass still covered by fabric. Better
horizontal curtain measurements include enough side extension for
useful stack-back where the wall permits.
Mistake 3: Buying Curtains That Only Match the Window Width
Curtain width should relate to the finished rod span and intended fullness, not
simply the width of the glass or window frame.
Panels that barely cover the opening can appear stretched and flat when closed,
even when their labelled width seems technically large enough.
Mistake 4: Ignoring Fullness
The curtain heading needs enough material to create visible folds. Without adequate
fullness, the panels lose depth and may appear undersized relative to the wall.
Revisit the fullness calculation and manufacturer guidance rather than assuming
more expensive fabric automatically means a fuller-looking treatment.
Mistake 5: Letting Curtains Finish Accidentally Short
Floor-length curtains that stop several unexplained centimetres above the floor
can break the vertical line and make the installation look unfinished.
A deliberate hover can work very well, but the gap should look intentional and
consistent across the panels.
Mistake 6: Using Too Much Puddle for the Room
Excess fabric can be elegant in the right setting, but large puddles in a busy
living room may look heavy, collect dust and interfere with everyday circulation.
Match the amount of extra length to the formality and practical needs of the room
rather than treating puddling as an automatic premium finish.
Mistake 7: Covering Too Much Glass When the Curtains Are Open
This often happens because the rod is too narrow or the curtain stack-back was not
considered when the width was planned.
Good curtain measurements anticipate where the fabric will sit
when open as well as how it will look when closed.
Mistake 8: Choosing the Wrong Number of Panels
A single panel may work beautifully for a one-direction door treatment, while a
pair often creates balanced stack-back around a conventional window.
Problems appear when panel count is chosen by habit rather than by opening style,
available wall space and total width requirement.
Mistake 9: Ignoring the Curtain Heading
Eyelets, pencil pleats, pinch pleats and wave systems do not hang from the same
reference point or require identical fullness.
Applying curtain measurements intended for one heading to another
can change both finished length and width.
Mistake 10: Forgetting About the Radiator
A visually attractive floor-length curtain can become impractical if it closes
directly across a radiator or conflicts with required heater clearance.
Heating and curtain decisions need to be resolved together before the panel length
is finalised.
Mistake 11: Trapping Curtains Behind Furniture
A sofa, sideboard or tall cabinet can prevent curtains stacking naturally and
flatten the lower folds.
Where possible, give the fabric breathing room. If furniture cannot move, adapt
the curtain solution instead of forcing the panel into the remaining gap.
Mistake 12: Using a Long Rod Without Enough Support
Extending a rod can improve the visual width of the window, but long spans need
suitable support.
Check the manufacturer's span, bracket and load recommendations. A sagging rod
undermines the very proportions the wider installation was intended to improve.
Mistake 13: Measuring Only One Side of the Window
Walls, floors and window positions are not always perfectly symmetrical.
Measure both side clearances and more than one vertical point where needed. Strong
curtain measurements are based on the real room rather than an
assumed perfect rectangle.
Mistake 14: Lowering the Rod to Fit the Curtains You Already Bought
This reverses the correct planning process. The curtain dimensions should support
the planned rod position rather than forcing the rod into a weaker height.
If the panels are incompatible with the chosen height, consider another length or
appropriate alteration instead.
Mistake 15: Treating Every Window the Same
Bay windows, patio doors, narrow windows and openings close to corners can require
different hardware, stacking directions or lengths.
The strongest curtain height and width rules provide a framework
for decisions, not an excuse to ignore unusual architecture.
Correct the Earliest Measurement Error First
If several problems appear together, return to the earliest weak stage in the
Houselyn framework rather than correcting each symptom separately.
Recheck Measure, Raise, Extend, Full, Lengthen, Clear and Check in order. A low
rod can create a length problem; a narrow rod can create a stack-back problem;
insufficient width can create a fullness problem.
The eight production chapters are now complete. Next, the FAQ will answer the
most common curtain measuring questions from basic rod height and panel width
through bay windows, radiators, heading types and troubleshooting.
Houselyn FAQ
Curtain Height and Width Rules FAQ: Rod Height, Fullness, Length & Measurement
These answers cover the most common curtain measurements
readers need before choosing rod height, rod width, fullness, panel count and
finished curtain length.
1. How high should curtain rods be above the window?
A practical starting point in many rooms is around 10–20 cm (about 4–8 inches)
above the top of the window frame where the architecture allows. The exact
height should still account for ceiling space, moulding, heading type, hardware
and the finished curtain drop.
2. Should curtain rods go near the ceiling?
They can, especially where there is generous space above the window and a
higher rod improves vertical proportion. However, the rod should not crowd
ceiling mouldings or leave too little room for brackets, rings or the chosen
curtain heading.
3. How far should curtain rods extend past the window?
A useful starting range is roughly 15–30 cm (about 6–12 inches) on each side
where wall space permits. Wider extensions can help open curtains stack mostly
off the glass, but the final distance should reflect fabric bulk, nearby walls
and hardware support.
4. How wide should curtain panels be?
Panel width should be based on the finished rod or track width multiplied by
the intended fullness. Matching the panel width only to the window frame can
leave too little fabric once the rod extends beyond the opening.
5. What does 2× curtain fullness mean?
It means the total finished curtain width is approximately twice the rod or
track width. For example, a 200 cm rod would use about 400 cm of total curtain
width as a starting point before heading-specific allowances.
6. Is 1.5× fullness enough for curtains?
It can be enough for a lighter or more restrained look, depending on the fabric
and heading. Some curtain systems need more fullness to form correctly, so
supplier or manufacturer guidance should be checked before ordering.
7. How long should curtains be?
Measure from the actual curtain hanging point to the intended finish. In many
living rooms, floor-length curtains create a strong vertical line, but shorter
sill or below-sill options can be more practical around radiators or fixed furniture.
8. Should curtains touch the floor?
They can just meet the floor for a tailored look, hover slightly above it for
easier maintenance, break softly, or puddle deliberately. The key is for the
finished length to look intentional rather than accidentally short.
9. How far should curtains be from the floor?
There is no single compulsory gap. A very small hover can be practical in busy
rooms, while other designs may just meet the floor. Check more than one point
where floors are uneven so the hem does not appear inconsistent.
10. Should curtains puddle on the floor?
Puddling is a decorative choice rather than a requirement. It can suit formal
rooms, but it increases maintenance and may be less practical around pets,
children, frequently used doors or busy walkways.
11. Can curtains hang over a radiator?
This depends on the radiator or heater design and manufacturer guidance. Full-
length curtains that close directly across heating can restrict heat movement
or conflict with required clearances, so the heating arrangement should be
checked before choosing the curtain length.
12. What curtain length works above a radiator?
Sill-length or below-sill curtains can be practical where the radiator sits
directly beneath the window, provided the fabric remains clear of the heating
zone and follows the relevant manufacturer's recommendations.
13. How do I measure curtains for a bay window?
Measure each section and angle rather than reducing the entire bay to one flat
width. The chosen bay pole or track system may have specific measuring rules,
so use its installation instructions when planning the final
curtain measurements.
14. How do I measure curtains for patio doors?
Measure the full opening, intended track or rod span, wall space available for
stack-back, door-handle clearance and the direction the curtains need to open.
A one-way draw can sometimes work better where only one side has enough free wall.
15. Should curtains cover the window frame when open?
Some overlap is normal, especially with fuller or heavier curtains. However,
extending the rod beyond the frame can allow more of the fabric to stack onto
the wall and leave a larger area of glass visible.
16. How many curtain panels do I need?
Two panels are common for conventional windows because they open from the centre,
but a single panel can suit some doors or asymmetrical spaces. The important
point is that the combined width provides the required coverage and fullness.
17. How do I measure eyelet curtains?
Measure according to the actual rod position and the curtain maker's instructions.
Eyelets usually place part of the curtain fabric above the rod, so the finished
drop should be taken from the correct point rather than assuming the top of the
rod equals the top of the fabric.
18. How do I measure pencil-pleat curtains?
Pencil-pleat headings are adjustable, but the starting curtain width still needs
enough fabric to gather attractively. Measure the intended track or rod coverage
and check the heading-tape guidance for the appropriate finished width.
19. Why do my curtains look too small?
Common causes include a rod mounted too low, a rod that is too narrow, insufficient
panel fullness, curtains that stop too short or open panels that cover too much
glass. Recheck the full set of curtain measurements before
changing colour or pattern.
20. What are the most common curtain measurement mistakes?
The biggest mistakes are measuring only the window rather than the surrounding
wall, choosing the rod width before considering stack-back, ignoring fullness,
buying the curtain length before fixing the rod height, overlooking radiators
and furniture, and failing to recheck the final installation before drilling.
Houselyn Action Plan
5-Step Curtain Measurement Plan: From Empty Window to Final Dimensions
Use this five-step process to turn the full guide into one practical set of
curtain measurements. The goal is to finish with a clear rod
height, rod width, total panel width, curtain length and clearance plan before
you buy or drill anything.
Step1
Measure the Window and Surrounding Wall
Record the outside frame width and height, floor-to-frame distance,
top-of-frame-to-ceiling gap, available wall on both sides, sill projection
and any radiator, furniture or door clearance that affects the opening.
Accurate curtain measurements begin with the architecture
around the window rather than the glass alone.
Record: frame width, frame height, ceiling gap, floor
distance, left clearance, right clearance and fixed obstacles.
Step2
Set the Curtain Rod Height
Decide how high the rod should sit using the space above the window, ceiling
details, curtain heading and intended visual proportion.
A starting range of roughly 10–20 cm (about 4–8 inches) above the frame can
work in many rooms, but the final height should suit the actual architecture
rather than follow a fixed number automatically.
Record: final hanging point from which the curtain drop will
later be measured.
Step3
Set the Rod Width and Side Extension
Decide how far the rod should extend beyond the frame so open curtains have
enough room to stack without unnecessarily covering the glass.
In many rooms, roughly 15–30 cm (about 6–12 inches) beyond each side can be
a useful planning range where wall space permits.
Record: final rod width plus the left and right extension
separately.
Step4
Calculate Fullness and Panel Width
Use the final rod width as the basis for fabric calculations. Multiply the
rod width by the chosen fullness level, then divide the total appropriately
between the number of panels.
As a planning guide, around 1.5× can create lighter gathering, around 2× is
a useful standard starting point and 2.5× or more can create a richer effect
where the fabric and heading support it.
Formula: Total Finished Curtain Width = Final Rod Width ×
Fullness Multiplier.
Step5
Confirm Length, Clearance and Hardware
Measure from the actual hanging point to the intended floor, sill or
below-sill finish. Then confirm radiator clearance, furniture clearance,
door and window operation, stack-back and bracket support.
These final curtain measurements should match the exact
heading, rod or track system you intend to install.
Final check: rod height, rod width, panel width, fullness,
finished drop, clearances and bracket support all agree.
Houselyn Conclusion
Curtain Height and Width Rules Work Best When Every Measurement Is Planned Together
Reliable curtain measurements do not come from choosing one
ideal rod height, one standard width or one fashionable curtain length in
isolation. The best results come from planning the entire installation as one
connected system.
The window itself provides only the starting dimensions. Ceiling height, wall
space, floor level, heading style, rod span, fabric fullness, radiators, nearby
furniture and the way the window or door operates all influence the finished result.
That is why useful curtain height and width rules need both
structure and flexibility. The framework gives you a clear order for making
decisions, while the real room determines where those rules need to adapt.
Use the framework in sequence. First record the architecture around the window.
Then set rod height and width, calculate fullness, choose the finished length,
resolve clearances and verify the entire installation before drilling or ordering.
The most important lesson is that one decision changes the next. Raising the rod
changes the drop. Extending the rod changes the amount of fabric required.
Increasing fullness changes stack-back. A radiator or door can change the length
or direction in which the curtains need to move.
Strong curtain measurements therefore need to be updated as the
plan develops rather than treated as a set of permanent numbers written down at
the beginning.
The same principle applies to hardware. A wider or heavier curtain treatment
needs rods, tracks, brackets and wall fixings that are appropriate for the span,
curtain weight and wall construction. Manufacturer instructions should take
priority where they specify load limits or installation requirements.
If several answers are no, return to the earliest weak stage rather than trying
to repair the appearance at the end. A rod that is too narrow can create a
stack-back problem. Insufficient fullness can make the panels look small. A poor
hanging point can create an awkward finished length.
Correct the measurement relationship first, then reassess the appearance.
Good curtain measurements should ultimately make the treatment
feel simple. The curtains should sit at the right scale, clear the important
features around them and operate without drawing attention to the compromises
behind the installation.
Continue Learning With Houselyn
Build on Your Curtain Measurements
Once the curtain height, width, fullness and finished length are settled, continue
with the Houselyn guides that help you balance the rest of the living room around
those fixed window proportions.
The Houselyn Editorial Team creates practical, design-conscious guidance for
decorating, organizing and improving everyday homes. Our approach focuses on
realistic proportions, functional planning, thoughtful purchasing decisions
and interiors that remain comfortable and usable after the styling is complete.
Use the Houselyn Knowledge Library to continue from whichever part of your
curtain measurements connects most closely with the next room
decision. The aim is to keep exact curtain sizing separate from whole-room
decorating, furniture placement and small-space planning.
1. Strengthen the Whole Living Room
Once the curtain measurements are settled, these guides
help you review proportion, layout and decoration across the entire room.
Even accurate curtain measurements can be undermined when
furniture, storage or everyday clutter blocks the curtain stack-back or
access to the window.
Once the curtain height and width rules have been resolved,
these guides help you move into the decorative layer without turning the
measurement page into a general styling article.
As the Living Room cluster expands, this library can connect
curtain measurements with the specialist sofa-and-rug sizing,
coffee-table styling, blank-wall and troubleshooting guides once those pages
are live.
Keeping those topics separate protects the role of this page. Exact
curtain height and width rules belong here; furniture placement,
general room styling and diagnostic whole-room fixes belong in their own guides.
If you need to revisit the curtain plan, return to the earliest weak stage:
Measure → Raise → Extend → Full → Lengthen → Clear → Check.
The objective of the Houselyn system is simple: accurate
curtain measurements should make the finished installation feel
balanced, functional and visually effortless.
Living Room cluster expansion:
add specialist pages to this Knowledge Library only after they are live. Avoid
publishing links to unfinished pages.
Discover college dorm decor ideas for colour, bedding, walls and personal touches that turn a plain student room into warm, stylish place that feels like home
Discover dorm bedding ideas that make small rooms feel like home. Learn how to create a cosy, stylish, and practical college dorm with smart bedding, storage, and decorating tips.
Discover practical dorm room organization ideas that help you organize clothes, desks, storage and daily routines for a calm, clutter-free college room.
Learn how to decorate a stylish and comfortable living room with practical design advice, timeless styling ideas, and expert inspiration from Houselyn.
Use these dorm desk organization ideas to create a clear college study space with better drawer systems, vertical storage, cable control and simple resets.