Dorm Desk Organization Ideas for a Clear College Study Space
Dorm desk organization ideas work best when they preserve a clear study
surface, assign every supply a practical home and make the desk easy to
reset after daily use.
A functional dorm desk leaves enough open space for coursework while
keeping frequently used papers, supplies and devices within easy reach.
Affiliate and Advertising Disclosure: Houselyn may earn
a commission from qualifying purchases made through selected links, at no
extra cost to you. Recommendations are included only where a product may
support the desk system explained in this guide.
A supplied college desk can become one of the hardest-working areas in a
dorm room. It may hold a laptop and course materials in the afternoon,
support personal administration in the evening and become a temporary
landing place for keys, chargers, drinkware and unopened post between
tasks.
The problem is rarely a complete lack of containers. More often, the
desk has too many objects competing for permanent surface space, drawers
without defined categories and organisers purchased before the student
knows what the desk needs to store.
Effective dorm desk organization ideas begin with the
supplied furniture. Its width, depth, drawer arrangement, nearby sockets,
overhead clearance and relationship to the bed determine which systems
will fit without making the workspace smaller.
This guide will help you build a desk that supports real coursework,
controls small supplies, uses measured vertical space and returns to a
usable condition without a lengthy cleaning session.
Why Dorm Desks Become Cluttered
Three Problems Usually Appear Before the First Organiser Is Needed
The Desk Becomes a Landing Surface
Objects are placed down temporarily because no easier return
location exists. Temporary placement gradually becomes permanent
clutter.
Every Item Remains Visible
Pens, papers, devices, personal items and decorations all compete for
attention, even when only a few categories are used every day.
Storage Reduces Working Space
Shelves and organisers may technically fit while leaving too little
room to open a laptop, notebook and course material together.
Understand the Study-Space Problem
Why Dorm Desk Organization Needs a Working System
Useful dorm desk organization ideas must do more than make
stationery look tidy. They should protect the space required for normal
coursework, reduce repeated searching and make every category easier to
return after use.
A dorm desk is usually supplied as part of the room rather than selected
for the student’s preferred equipment or working style. Its dimensions,
drawers, surface finish and position may already be fixed before the
student decides what needs to live there.
That makes the desk different from a home office assembled around
purchased furniture. The organisation system has to respond to the
existing footprint, work around nearby furniture and leave enough room
for the chair, drawers and devices to operate properly.
The desk may also support several routines. Coursework remains its
primary purpose, but it can quickly become a place for charging, personal
administration, getting ready, opening post, eating a snack or placing
anything that has not yet been returned elsewhere.
The strongest dorm desk organization ideas therefore
create boundaries. They determine what belongs permanently on the desk,
what should arrive only for a particular task and what needs to be stored
somewhere else in the room.
Six Reasons the Desk Needs a System
Understand What Is Creating the Clutter Before Adding Storage
1
The Supplied-Desk Constraint
The student may not control the desk’s width, depth, drawer layout,
finish or relationship to the bed. Any organiser added later must
work within those fixed conditions rather than reducing the desk’s
usefulness.
2
The Multi-Use Problem
Coursework, devices, personal administration and occasional daily
routines can compete for the same surface. Without boundaries, every
routine begins leaving part of itself behind.
3
The Catch-All Effect
The desk is convenient, visible and easy to reach. When another item
lacks a clear home, the desktop becomes its temporary location until
temporary placement develops into a permanent pile.
4
The Container Trap
Containers can organise a category, but they cannot decide whether
that category deserves desk space. Buying organisers first may turn
loose clutter into contained clutter while leaving the surface just
as crowded.
5
The Clear-Surface Requirement
A tidy-looking desktop can still fail if a notebook, laptop and
textbook cannot be used together. The desk needs deliberately
protected open space, not merely attractive storage.
6
The Reset Requirement
A desk system must survive ordinary weeks, deadline pressure and
changing courses. When returning supplies takes too many steps, the
setup depends on motivation rather than practical design.
Quick Desk Diagnosis
Match the Visible Symptom to the Real Cause
Before applying more dorm desk organization ideas,
identify what repeatedly goes wrong. The first action should address the
cause rather than cover the symptom with another container.
Visible Symptom
Likely Cause
First Action
No room to open a notebook
Too many objects have permanent surface positions.
Remove everything that is not used during most study sessions,
then protect an active work zone.
Drawers become mixed catch-alls
Categories were never defined by task or frequency.
Empty the drawer, group the contents and assign broad functional
categories before adding dividers.
Chargers are difficult to find
Devices and cables have no consistent parking location.
Create one charging zone and separate active chargers from
backups or obsolete cables.
Books repeatedly cover the desk
Active papers and reference materials have no vertical home.
Assign one measured file holder or shelf area to current
coursework.
The desk looks crowded despite organisers
Too many categories remain visible at the same time.
Consolidate similar supplies and move low-frequency categories
into drawers or another room zone.
Objects migrate from across the room
Their real storage locations are inconvenient or undefined.
Create easier return locations near the point where each item is
actually used.
The setup works briefly, then becomes messy
No end-of-task or weekly reset has been designed.
Add a short closing routine and a weekly review for papers,
supplies and migrated belongings.
No Room to Open a Notebook
Cause: Too many permanent surface items.
First action: Remove low-frequency objects and
protect the active work zone.
Drawers Become Catch-Alls
Cause: Categories are undefined.
First action: Group contents by task and frequency
before adding dividers.
Chargers Are Difficult to Find
Cause: No consistent device-parking area.
First action: Create one charging zone and remove
unused cables.
Books Cover the Working Surface
Cause: Active papers have no vertical home.
First action: Assign one measured file or shelf area
to current coursework.
The Desk Looks Crowded Despite Organisers
Cause: Too many visible categories.
First action: Consolidate supplies and relocate
low-frequency groups.
Objects Migrate From Across the Room
Cause: Return locations are inconvenient.
First action: Move storage nearer to where the item
is actually used.
The Setup Becomes Messy Again
Cause: No repeatable reset routine.
First action: Add an end-of-task reset and a weekly
review.
Part I • Confirm the Supplied Workspace
Start Dorm Desk Organization Ideas With a Desk Profile
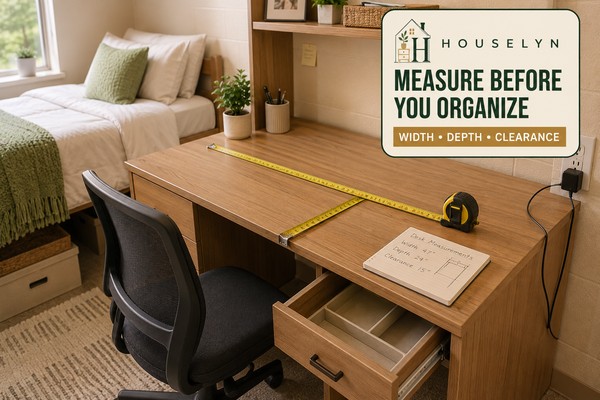
Measure the working surface, drawers, vertical clearance and surrounding
movement space before choosing products for the desk.
The first step in applying dorm desk organization ideas
is to create an accurate profile of the desk that already exists. Its
measurements and operating limits should guide every later shelf, drawer,
cable and storage decision.
Measure the Desk as a Working Object
Basic width and depth are only the beginning. A product can fit within
the outside dimensions while interfering with the way the desk is used.
Drawers need space to open, the chair needs room to move, and the student
needs enough depth to position a laptop, notebook and reference material
without stacking one task on top of another.
Measure the clear surface after accounting for any raised back edge,
fitted shelf, built-in lamp, cable opening or furniture panel. This
usable area is more important than the desk’s advertised footprint
because it represents the space available for coursework.
Effective dorm desk organization ideas preserve this
active area. Storage should be designed around it rather than occupying
it first and leaving the student to work in whatever space remains.
Record the Profile Before Browsing Products
Keep the measurements and restrictions together in a phone note, small
document or printed worksheet. This turns future shopping into a
comparison against known limits rather than a guess based on product
photographs.
Add a short description of the student’s normal study setup. A student
who uses only a laptop needs a different working area from one who
regularly opens large textbooks, sketchbooks, laboratory notes or a
separate keyboard.
The profile also helps separate useful dorm desk organization
ideas from products that merely look organised. A shelf,
drawer insert or stand should solve a documented space or access problem.
Part II • Clear and Zone the Surface
Use Dorm Desk Organization Ideas to Create Clear Working Zones
A successful desk layout protects the main coursework area while giving
papers, devices and small daily objects controlled supporting zones.
The next stage of applying dorm desk organization ideas
is to clear the surface and assign its limited space by function. The desk
should support current work first and display or store secondary objects
only when they do not interrupt that purpose.
Clear the Surface Before Designing the Zones
Remove every movable item from the desktop and clean the empty surface.
This creates a neutral starting point and reveals how much usable area
exists without containers, decorations and supplies competing for
attention.
Return only the equipment needed for the student’s most common study
session. That might include a laptop, one notebook, a current textbook
and a writing tool. The space occupied by this ordinary task becomes the
protected work zone.
Strong dorm desk organization ideas do not begin by
filling the remaining space. They preserve flexibility so course
materials can change without requiring the whole desktop to be
reorganised.
Separate “Currently Using” From “Might Use”
The desktop should represent current routines rather than every possible
task. A student may own art supplies, spare stationery, old notebooks,
cables, envelopes and course materials without needing all of them
within immediate reach.
Keep frequently used objects close and move occasional supplies into
drawers or another measured storage area. This reduces visual noise and
prevents the desk from becoming a display of every item associated with
studying.
Review duplicates as well. Several pens may support daily work, but a
large collection of similar stationery consumes useful space without
improving access. Keep a practical working quantity and place backups
outside the active zone.
Part III • Contain Supplies and Papers
Organize Dorm Desk Drawers by Frequency and Task
Broad, predictable drawer categories are easier to maintain than a
separate compartment for every individual pen, clip and accessory.
The containment stage of dorm desk organization ideas
turns drawers and small organisers into predictable task systems. Supplies
should be grouped according to how often they are used and which activity
they support—not simply by colour, size or product type.
Empty Every Drawer Before Designing the Compartments
Remove the full contents of each desk drawer and place similar objects
together. Do not begin by returning items to their previous locations.
The empty drawer provides a chance to decide which categories deserve
immediate access and which have occupied space through habit.
Separate current stationery, active course tools, spare supplies,
cables, personal items and unrelated objects. Discard dried pens, empty
packaging, outdated papers and anything that has no planned desk role.
Effective dorm desk organization ideas define the
categories before selecting trays. Otherwise, the organiser determines
the system and the student begins forcing objects into compartments that
do not match the way the supplies are used.
Keep Personal-Care Supplies Separate When the Desk Has Two Roles
Some students use the desk for getting ready as well as studying. Keep
personal-care products inside one removable, wipeable caddy or contained
drawer section rather than mixing them through the stationery system.
The container should leave the active work area when the personal-care
routine ends. This protects paper and technology while making the change
between routines more complete.
Part IV • Elevate Selected Categories
Add Vertical Dorm Desk Organization Ideas Without Losing Workspace
Vertical storage should lift selected categories away from the working
surface without blocking light, sockets, ventilation or comfortable
access.
Vertical dorm desk organization ideas can create useful
storage above a small study surface, but height is only valuable when the
shelf, riser or hutch preserves working depth, remains stable and stores
categories that genuinely need desk proximity.
Protect Working Depth Before Expanding Upwards
The width of a desktop shelf often receives the most attention because
it is easy to compare with the outside width of the desk. Depth is
equally important. A shelf can fit from left to right while consuming
the rear space needed for a laptop, textbook, keyboard or comfortable
writing position.
Return the normal study equipment to the desk before testing a raised
organiser. The laptop and notebook should remain in their natural
positions rather than being pushed forwards to create the appearance of
a fit.
Effective dorm desk organization ideas use height to
relieve pressure on the surface. A vertical addition that forces the
student into a shallower or less comfortable study position has moved
the problem rather than solved it.
Decide Whether a Dorm Desk Hutch Is Worth the Footprint
A dorm desk hutch can be useful when the supplied desk has little drawer
storage and several legitimate study categories need vertical access.
It is less useful when the student works almost entirely digitally, has
an existing supplied shelf or cannot maintain sufficient depth beneath
the structure.
Large hutches can also create visual weight in a compact room. Open
shelves display every category, so the structure may make the desk feel
crowded even when the surface is technically clear.
Compare the hutch against a narrower shelf, laptop riser or one small
drawer unit. The best solution is not the product with the most storage;
it is the option that contains the required categories while leaving the
desk comfortable to use.
Part V • Route Technology and Charging
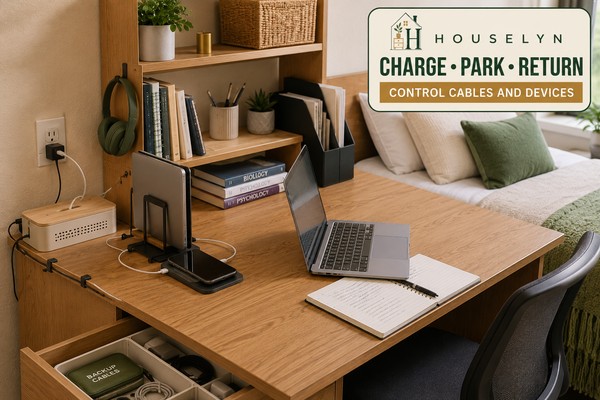
Manage Cables, Chargers and Devices at the Dorm Desk
A controlled technology zone gives every active device a parking place
and keeps charging cables away from the writing area, drawers and chair.
Technology-focused dorm desk organization ideas should
make the correct charger easy to identify, create predictable parking
positions for devices and prevent cables from spreading across the working
surface or movement route.
Begin With the Devices That Are Actually Used
List the devices that regularly need to operate or charge near the desk.
A typical setup may include a laptop, phone, tablet, headphones or
calculator, but every device does not need a permanent charging
connection.
Remove obsolete leads, duplicates with no backup purpose and chargers for
devices that are no longer used. Place occasional cables in a labelled
backup pouch rather than allowing them to remain within the active
charging zone.
Practical dorm desk organization ideas reduce the
number of loose components around the student. They do not attempt to
display every cable neatly while leaving all of them connected.
Label Similar Chargers Without Creating Visual Noise
When several chargers look alike, add a small label near the device end
or storage pouch. Use a short device name rather than a decorative tag
large enough to catch on other cables.
The label should answer one question quickly: which device does this
cable support? Colour-coding can help when it remains consistent, but too
many colours may make the charging area look busier without improving
identification.
Coiled backup leads should also be labelled before entering a drawer.
Unidentified cables tend to remain indefinitely because the student does
not know whether they are safe to remove.
Part VI • Support Flexible Daily Use
Create Flexible Dorm Desk Organization Ideas for Study and Daily Routines
Portable routine kits allow one supplied desk to support more than one
activity without giving every activity permanent surface space.
Flexible dorm desk organization ideas allow one compact
surface to support coursework, personal administration and occasional
daily routines without forcing those activities to remain visible at the
same time.
Keep Study as the Desk’s Default Position
A dorm desk may need to perform several jobs because the room offers few
alternative surfaces. That does not mean every job should receive a
permanent setup. The desk needs one default condition that remains ready
for its most important responsibility.
For most students, that default is a study-ready surface with the chair
accessible, the active work zone open and essential technology in its
usual position. Secondary routines should temporarily convert this
setup rather than gradually replacing it.
Useful dorm desk organization ideas therefore organise
movement as carefully as objects. The system must explain how a routine
arrives, which area it may use and where its belongings return when the
task is complete.
Build Portable Kits Around Complete Routines
A useful portable kit contains the full set of items needed for one
activity without becoming a general storage basket. Its contents should
make sense together, and the container should have a permanent home away
from the desk.
The return location matters as much as the caddy itself. When the kit has
to be carried across the room, rearranged on a crowded shelf or divided
among several drawers, the student is more likely to leave it on the
desktop.
Strong dorm desk organization ideas minimise that
friction. The container should be easy to lift, simple to wipe and small
enough to fit within its assigned wardrobe, drawer or shelf position.
Part VII • Maintain and Improve the System
Maintain Dorm Desk Organization Ideas Through the Semester
A short reset protects the study surface before unfinished papers,
chargers and daily belongings become the next task’s starting condition.
The final stage of successful dorm desk organization ideas
is maintenance. A desk system should recover from ordinary study sessions,
busy deadlines and changing course demands without requiring the student
to rebuild the entire setup.
Design Maintenance Into the Organization System
A desk does not stay organised simply because the original setup was
carefully planned. Coursework changes, supplies are consumed, papers
accumulate and temporary objects continue arriving throughout the
semester.
Maintenance becomes easier when the desk has more than one reset level.
Small problems should be corrected after a task, while larger category
changes can wait for a weekly or mid-semester review.
Practical dorm desk organization ideas therefore use
short, repeatable actions instead of depending on an occasional major
clean. The desk should recover gradually before clutter reaches the point
where study must stop for a full reorganisation.
Make the Evening Reset Prepare Tomorrow’s First Task
The evening reset is not a complete cleaning routine. Its purpose is to
prevent the next day from beginning with unfinished decisions.
Identify the first likely task and place only the necessary planner,
notebook or current folder within easy reach. Avoid covering the desk
overnight with every item needed for the entire following day.
When devices need charging, place them in the approved charging area and
keep the main surface clear. The student should wake to a desk that feels
prepared rather than occupied.
Adjust the System When the Semester Changes
A drawer arrangement that worked during the first month may no longer
match the student’s courses. New modules can require different papers,
specialist tools or more frequent reference materials.
The mid-semester reset should update the system rather than simply clean
it. Remove completed materials, revise drawer access levels and reconsider
organisers that no longer hold an active category.
Strong dorm desk organization ideas remain flexible.
A tray, shelf or container should be reassigned or removed when the
original problem disappears.
Frequently Asked Questions
Dorm Desk Organization Ideas: Questions Students Commonly Ask
These answers bring the complete system together, from organising a small
supplied desk and choosing storage products to managing cables, sharing the
surface between routines and keeping the setup functional throughout the
semester.
Beginner Questions
Start With the Desk and Its Primary Function
1. How do I organize a dorm desk in a very small room?
Begin by removing everything from the desktop and recording its
usable width and depth. Return the laptop, notebook and materials
needed for a normal study session first. The space those items occupy
becomes the protected working zone.
Sort the remaining belongings into four outcomes: keep on the
surface, move into a drawer, relocate elsewhere in the room or remove
completely. A small desk should not contain every item connected to
college life.
Use drawers for small supplies, one slim vertical holder for active
papers and a controlled device-parking area. Add vertical storage
only when it leaves enough room for real coursework. These
dorm desk organization ideas work because they
protect function before adding capacity.
2. What should I keep permanently on top of my dorm desk?
Keep only items used during most study sessions or required for the
desk to operate. This may include a laptop, task light, one small
stationery holder, a slim current-paper file and one restrained
personal object.
The exact list depends on the student’s courses and working style. A
calculator may deserve permanent access for one student, while art
tools, laboratory equipment or specialist stationery may belong in a
portable course kit for another.
Backup supplies, old notebooks, unopened post, multiple decorations,
spare chargers and personal-care collections usually do not need
permanent desktop positions.
3. How much of a dorm desk should remain clear?
There is no useful universal percentage because dorm desks and course
requirements differ. The practical test is whether the student can
open the normal laptop, notebook and current reference material
together without moving unrelated belongings.
Enough depth should remain for comfortable writing and device use.
Enough width should remain for changing between typing, reading and
note-taking. The student should not need to balance a notebook on the
front edge or stack current materials beneath the laptop.
Treat clear space as part of the organisation system rather than
leftover space waiting to be filled.
4. Should I organize my dorm desk before move-in?
Plan categories before move-in, but delay precise organiser purchases
until the supplied desk and room can be verified. Residence
photographs may not reveal the internal drawer dimensions, socket
position, overhead clearance or how closely the desk sits beside the
bed.
Bring a measuring tape, a small temporary stationery pouch and only
the basic supplies needed for the first few days. After move-in,
complete the Houselyn Desk Profile and observe which categories
repeatedly need desk access.
The broader
Dorm Room Essentials guide
can help separate confirmed needs from purchases that should wait
until the room is inspected.
Practical Storage Questions
Organize Drawers, Papers and Vertical Space
5. How should I organize dorm desk drawers?
Empty every drawer, group similar objects and classify them by
frequency and task. Give the easiest-to-reach drawer to daily tools,
use a secondary drawer for weekly supplies and place replacements or
occasional accessories in the least convenient position.
Daily categories may include primary pens, highlighters, a
calculator and a small ruler. Weekly categories may include scissors,
tape, index cards or course-specific tools. Backup stock should remain
limited and separate from the working quantity.
Measure the internal drawer dimensions before buying inserts.
Adjustable trays are usually more flexible than rigid organisers with
a predetermined compartment for every small object.
6. What can I do if my dorm desk has no drawers?
First reduce the number of categories that require desk proximity.
Keep daily writing tools in one compact holder and store occasional
stationery inside a portable pouch or caddy elsewhere in the room.
A narrow freestanding shelf, small stackable drawer unit or slim file
holder may help, but each product must pass the Vertical Fit Check.
Confirm its footprint, stability, remaining working depth and whether
the student can open the storage without moving the laptop.
Broader room categories should move into the systems covered in the
Dorm Room Storage Ideas guide
rather than being forced onto the study surface.
7. Which desk organizers are most useful for a dorm room?
The most useful organiser is the smallest product that solves a
verified access problem. Commonly practical options include
adjustable drawer trays, a compact writing-tool holder, one slim
vertical file, a stable laptop riser or removable cable clips.
Avoid buying a complete matching organiser set before deciding what
each piece will contain. Empty compartments often attract unrelated
objects, while oversized systems reduce working space.
Before purchasing, ask:
Which defined category will this organiser hold?
How often will that category be used?
What working or storage space will the product consume?
Can the student return the contents easily?
8. How can I use vertical storage above a dorm desk safely?
Measure the desk width, usable depth and vertical clearance before
adding a freestanding shelf or hutch. Keep heavy books and devices on
the lowest stable level, use middle shelves for current light
materials and reserve upper positions for lightweight,
infrequently handled objects.
The structure should not block natural light, approved sockets,
ventilation openings or the safest cable route. It should remain
stable when a book or device is removed.
Confirm residence rules before attaching anything to the wall. Do not
assume drilling, screws or strong adhesive products are permitted.
Freestanding storage is generally easier to adapt when the housing
rules or desk position are uncertain.
9. Is a dorm desk hutch worth buying?
A hutch may be useful when the supplied desk has little enclosed
storage, several current study categories require close access and
the structure leaves sufficient working depth.
It may not be worthwhile when the desk already has a supplied shelf,
the student works mostly digitally or the hutch would mainly provide
empty levels that encourage unnecessary belongings to collect.
Compare a full hutch with a narrower desktop shelf, laptop riser or
single stackable drawer. The product with the greatest capacity is
not automatically the best choice. Use the option that solves the
documented need while preserving light, comfort and workspace.
10. How should I organize textbooks, folders and loose papers?
Keep only current materials at the desk. Use one narrow vertical
holder for active folders, course handouts and documents requiring
action. Completed or inactive papers should move into longer-term
filing during the weekly reset.
Avoid storing every textbook on the desktop. Keep current reference
books within reach and relocate books that are not part of the
present course or assignment.
A simple paper system can use three decisions:
Current: connected to active coursework.
Process: needs filing, scanning or returning.
Remove: completed, submitted or no longer needed.
Technology and Multi-Use Questions
Control Devices Without Losing Flexibility
11. How do I manage cables on a small dorm desk?
List the devices used regularly and remove obsolete, damaged or
unnecessary duplicate cables. Give each active device one parking
position and one controlled route to the approved socket.
Trace the route before attaching clips. Keep cables away from the
notebook area, drawer fronts, chair movement and roommate pathways.
Use removable clips only where a cable naturally changes direction
or repeatedly falls behind the desk.
Never place cables beneath rugs or conceal damaged electrical
equipment inside a decorative box. Follow the residence’s current
rules for charging products, extension equipment and socket use.
12. How can I stop chargers from falling behind the desk?
Place the device in its normal working or parking position and leave
enough cable slack for ordinary movement. Use a removable cable clip
near the desk edge to hold the connector when it is unplugged.
The clip should fit the cable diameter without pinching it and should
use an attachment method suitable for the supplied desk finish.
Confirm that removable adhesive products are permitted and test them
discreetly where appropriate.
Label similar-looking chargers with the device name and store backup
leads in a separate labelled pouch. Only active chargers need to
remain near the desk.
13. How can I use my dorm desk as a vanity and study area?
Keep study as the desk’s default condition and make the personal-care
routine portable. Store grooming products inside one wipeable caddy
and use a freestanding mirror that leaves the desk when the routine
ends.
Before personal-care products enter the surface, close or park the
laptop and return papers to a drawer or vertical file. Keep liquids,
powders and heated tools away from technology, chargers and course
materials.
Use the Clear → Convert → Use → Return → Reset sequence. The desk
becomes a vanity temporarily, but the personal-care setup should not
remain layered over the study system.
14. How can I make a dorm desk look aesthetic without creating clutter?
Limit decorative objects to one compact personal-accent zone. A small
photograph, restrained plant or meaningful object can add warmth
without spreading across the entire surface.
Use repetition through a limited material or colour palette rather
than purchasing several decorative containers. Warm neutrals, natural
wood and one controlled accent can make the desk feel intentional
while allowing functional items to remain visually calm.
Hide low-frequency supplies inside drawers, keep active papers
vertical and leave enough negative space around the laptop and
notebook. A desk usually appears more polished when fewer categories
remain visible.
Maintenance and Framework Questions
Keep the System Working Through Real College Life
15. How often should I reset my dorm desk?
Use several reset levels rather than waiting for one major clean.
Complete a short reset after each study task, prepare the surface for
tomorrow during the evening and process papers, supplies and migrated
belongings once a week.
Complete a deeper review around the middle of the semester or when
the course load changes. Archive completed work, revise drawer
priorities and remove organisers that no longer support an active
category.
The most sustainable dorm desk organization ideas
make small corrections before the desk becomes too cluttered to use.
16. How should I organize my dorm desk during exams?
Simplify the setup around the current exam, module or assignment.
Keep only the active course materials, essential stationery and
required devices within immediate reach.
Remove decorative collections and secondary routines temporarily.
Protect enough space for the laptop, revision notes and writing.
Maintain reliable charging without adding extra gadgets or loose
cables.
Use broad return categories during intense periods. A single current
folder and a straightforward writing-tools section are often easier
to maintain than a highly detailed arrangement. Busy periods need
fewer decisions, not more storage rules.
17. What is the Houselyn Dorm Desk Blueprint?
The Houselyn Dorm Desk Blueprint is the seven-stage method used
throughout this guide:
Confirm → Clear → Zone → Contain → Elevate → Route → Reset.
Confirm: measure the supplied desk, drawers,
clearance, sockets and room restrictions.
Clear: remove objects that do not deserve
permanent desk space.
Zone: protect the active work area and assign
limited supporting zones.
Contain: give defined supplies and papers
predictable homes.
Elevate: use measured vertical space without
reducing working depth.
Route: control chargers, cables and device-parking
positions.
Reset: maintain the system through short, layered
routines.
The blueprint turns individual dorm desk organization
ideas into one connected system. It prevents the student
from buying products first and trying to create a purpose for them
afterwards.
Complete the Dorm Desk Blueprint
Bring Dorm Desk Organization Ideas Together in the Right Order
The most effective dorm desk organization ideas are not
isolated storage tricks. They form a connected sequence that begins with
the supplied furniture, protects the student’s working area and finishes
with a reset process that keeps the desk usable during real college life.
Build the System Around the Student’s Actual Work
A functional desk does not need to hold every useful college item. It
needs to support the tasks that regularly happen there and give each
supporting category a return location that is easy to use.
The process begins with evidence: the dimensions of the supplied desk,
the internal drawer capacity, the vertical clearance, the approved
electrical setup and the student’s normal combination of devices and
course materials.
Once those conditions are understood, the surface can be cleared and
divided by responsibility. Drawers can contain daily supplies, vertical
storage can support active materials and technology can follow controlled
routes rather than spreading across the workspace.
Maintenance completes the system. A desk that cannot recover after a
study session is only temporarily organised, regardless of how polished
it looked when the setup was first completed.
Final Conclusion
Create a Dorm Desk That Is Ready for Real College Work
A small supplied desk can support focused study when the organisation
system respects its measurements, protects the working surface and limits
the number of categories that remain visible.
Start with the desk itself rather than a collection of organisers.
Confirm the available space, clear unrelated belongings and build zones
around the student’s ordinary coursework. Use drawers and vertical
storage selectively, give devices controlled positions and keep temporary
routines portable.
The final measure of success is not whether the desk remains perfectly
styled. It is whether the student can begin work, change tasks and restore
the area without repeated searching or a major clean-up.
When applied in sequence, these dorm desk organization
ideas turn one compact piece of supplied furniture into a clear,
adaptable and maintainable college study space.
Start by measuring the supplied desk, then organise only the categories
that genuinely need to support study within that footprint.
Houselyn Knowledge Library
Continue Building a Functional College Dorm Room
The desk works best when the rest of the room has equally clear
responsibilities. Continue with these Houselyn guides to connect study,
storage, decorating and everyday college routines.
Dorm Room Ideas
Plan the full room as a connected living, sleeping, studying and
storage environment.
Discover college dorm decor ideas for colour, bedding, walls and personal touches that turn a plain student room into warm, stylish place that feels like home
Discover practical dorm room organization ideas that help you organize clothes, desks, storage and daily routines for a calm, clutter-free college room.
Discover dorm bedding ideas that make small rooms feel like home. Learn how to create a cosy, stylish, and practical college dorm with smart bedding, storage, and decorating tips.
Learn how to decorate a stylish and comfortable living room with practical design advice, timeless styling ideas, and expert inspiration from Houselyn.